Empty Fridge Magic

I don’ t know about y’all, but at least once I week I open my fridge to pull out my lunch and then realize – oops.  The leftovers I thought were there aren’t.  This week, that day was today and what greeted me upon opening the fridge was:

  • a package of moldy old grapes
  • two eggs
  • limp celery
  • stems from the broccoli I had last week but couldn’t bear to throw out
  • bag of cranberries remaining from Thanksgiving (but miraculously still good!)
  • crunchy rice left over from Tuesday’s dinner

It was bleak, but I persevered:  I mean, it was that or order Chinese food.  And I had no cash.

Luckily, I remembered the broccoli stems taste good. And that I’d read a recipe for fried rice a few weeks ago. And that I love poached eggs.  Thus I give you Broccoli Stem Stir Fry, for one (caveat: this is not quite a stir fry in the traditional sense. I just took some artistic license with the name).

Broccoli Stem Stir Fry

Ingredients:

4 broccoli stems, peeled and cut into bite-sized pieces
1 egg
a cup or so of stale cooked rice (at least one day old)
scant 1/2 TBL white sugar
scant 1/2 TBL brown sugar
1 TBL sesame oil
1 TBL soy sauce
pinch curry powder
1/4 tsp or so Hoisin sauce
olive oil and salt

Directions:

Preheat the oven to 425*F.  While oven is heating, peel the broccoli (I use a knife rather than a veggie peeler for this job), making sure to remove all the tough and woody bits.  Then throw the broccoli into a roasting pan with some olive oil and salt, and toss to make sure it’s covered. Roast for 15-20 min, or until tender enough to stab with a fork but not so soft it falls apart.

When you have about 5 minutes to go with the broccoli, you’re going to start prepping both the  poached egg and the rice.  First, put water and a splash of white vinegar in a small saucepan and set over high heat (it’s best if you use only a couple inches of water).  While the water heats, put about 1 TBL of sesame oil in a separate saute pan over medium heat.  Use your hands (or a fork, if you’re more dignified than I) to break up the clumps in your rice.  Then put it in the pan and stir for 2-3 minutes, until warmed through.  Remove the rice to whatever bowl you plan to eat out of.

Now check on the water for the egg – if air bubbles have started rising to the surface, you’re ready to poach.  What I do is use a slotted spoon to create a whirlpool in the pot and crack the egg right into the middle of the maelstrom.  Don’t stir – just gently prod the egg if it seems some of the white is sticking to the bottom of the pot.  If it’s not sticking, just let it be for 4 min.  If it is sticking, keep prodding it and stirring gently in a circular motion to keep the whirlpool effect going.  And whatever you do, don’t allow the water to boil or bubble!  When the 4 min is up, use the slotted spoon to gently scoop the egg from the water and lay it on a paper towel on your counter. Then just leave it there to drain while you finish the rest of the recipe.

By this point, your broccoli is probably done.  Take it out of the oven and let it sit for a minute while you combine the soy sauce, sesame oil two sugars, Hoisin sauce, and curry powder in a ramekin.  Then throw the broccoli in to the same saute pan you used to cook the rice, and put the soy mixture over top.  Mix about a tsp of corn starch with a bit of water to form a somewhat liquidy roux and pour that over the broccoli, also.  Stir continuously – the mixture will begin to thicken, creating a glossy, syrupy coating for the broccoli. This is what you want, so make sure that the broccoli stays in the sauce during the process.

When your sauce reaches the consistency you want, turn off the burner and pour the broccoli over your rice. Then place the poached egg on top and eat!

Now that I’ve typed it I realize this sounds like a complicated recipe, but that’s probably because of the way I structured it. I did all the pieces simultaneously when I made it: while the broccoli cooked, I did the rice and the egg and the sauce and all the components ended up being ready at about the same time. If you don’t feel so comfortable doing all those things at once, this is a perfectly fine recipe to break into chunks and tackle one piece at a time!

Posted in Uncategorized | 1 Comment

Vegan Sloppy Joes

Wow, what a busy few weeks it’s been for me! I can hardly believe it, but January is coming to a close, school starts back up again Friday, and my vacation, though barely begun, is already over.  Thankfully, I just got back from Miami, where I got to spend some time doing this:

Readers, that was sorely needed.  Alex and I began every day with an hour+ stroll along the beach, during which we walked hand in hand, periodically wading knee-deep into the surf to admire the sealife. Bliss! And even better was that when we returned from our very last walk I got an email from my department telling me that I had passed comps. I can’t begin to tell you what a relief that was, and how wonderful it has been to truly leave some of my stress in Miami for good!

Anyway, now that I’m back – and back to the grind – I wanted to share this recipe with you. I made it while I was prepping for comps but convinced myself that I was too busy and stressed to post about it then.  Forgive me! And then make it as soon as possible. It was delicious and hearty and healthy – everything a January meal should be! As you can see, Rand has already given his approval. What more spur to action could you need?

Vegan Sloppy Joes

Ingredients:

1 cup brown lentils
1 TBL olive oil
1 medium onion, minced
1 red bell pepper, minced
3 cloves garlic, minced
1 can tomato sauce
2.5 TBL tomato paste
1/4 cup brown sugar (add 1 TBL at a time, to taste)
2-3 TBL Worcestershire sauce
1-2 tsp Coleman’s mustard powder
2 tsp balsamic vinegar
1 tsp salt
1 heaping tsp Spanish paprika

Directions:

Put the lentils in a pot and cover with two inches of water.  Bring to a boil, then cover and simmer until the lentils are almost fully cooked.   Rise with cool water and let drain.

While the lentils are cooking, prep the vegetables.  You can cut the pieces any size you want, but I think it works best when the onion and red pepper pieces are cut small, so each piece is about the size of a lentil.  Next, heat 1 TBL or so of olive oil in a saute pan over medium-high heat (I used my stainless 3qt pot) and cook veggies until translucent.  Then reduce heat to medium and add the rest of the ingredients (but not the lentils, yet!).  Simmer, covered, for a few minutes until the sauce is heated through.

When the sauce is heated, add the lentils to the mix and stir.  Now just let the pot bubble until the lentils are the texture you desire and the sauce is the right consistency.  I like it when my sauce is glossy and smooth, clinging to the lentils rather than souping out across the plate – so I let it simmer for awhile. Just be sure to keep stirring if you do the same thing!

To serve, toast up some hamburger buns, toss on the sloppy joe mix, and serve. It tastes especially good with a handful of spring greens and a light grating of parmesan cheese sandwiched in. And if you have any leftovers, I recommend serving some sloppy joe mix on top of half a bun, with a poached egg on top.

Serves 6-8.


Posted in Uncategorized | Leave a comment

Ginger Whisky Tea

Snowflakes are falling past my window right now, and I’ve had one of those lazy, bundled up days that make me so enjoy colder weather.  I’m wearing thick rag socks, have wrapped myself up in my favorite grandma sweater, and am swaddled in a thick grey blanket I got at the Abbey Woolen Mill in Wales when I was 18.  I’m also firmly ensconced on my couch this afternoon, where I’m alternating between studying 20th century American history for my upcoming comps, playing Nintendo (the new Super Mario Brothers for Wii, which makes me feel like I’m 10 again), and doing recipe research.

I am very pointedly NOT cleaning my kitchen from last night’s cooking disaster, wherein I attempted to make Yottam Ottolenghi’s Caramelized Garlic Tart.  In fact I am avoiding the room altogether, save my venturing in there, whilst averting my eyes from the pile of dishes, to make one of my favorite winter time drinks.  I don’t know how to take compelling pictures of a drink – having an opaque mug  is a puzzle that I can’t get myself past – and I’m really too lazy to figure it out (see: above paragraph, where I basically extoll the virtues of being a couch sloth).  But trust me when I say that if you, like me, are sitting by your living room window, watching the snowflakes flurry and the wind whistling through the trees, you probably want to be drinking this, too.

Ginger Whisky Tea

Ingredients:
knob of ginger, sliced (an inch or so in both length and width
tsp or so of honey (to taste)
whisky (I never measure, but rather tip the bottle over my mug while counting to three)
slice of lemon optional
boiling water

Directions:

I feel like it’s cheating to give you directions, because you’ve more than likely already figured it out. Nevertheless – put the sliced ginger in the mug, pour hot water over it, and then stir your honey in until it dissolves.  Add whisky to taste, and a lemon slice if you like.  Let sit for a minute while the ginger infuses the water, then drink.

You should know that the ginger taste will intensify the longer it sits, becoming delightfully spicy by the time you finish the mug.  I like the spice, but if you don’t you should take your ginger out when it reaches a flavor you like. And don’t throw it away! You can use the same slices of ginger for at least two refills.

Posted in Uncategorized | Leave a comment

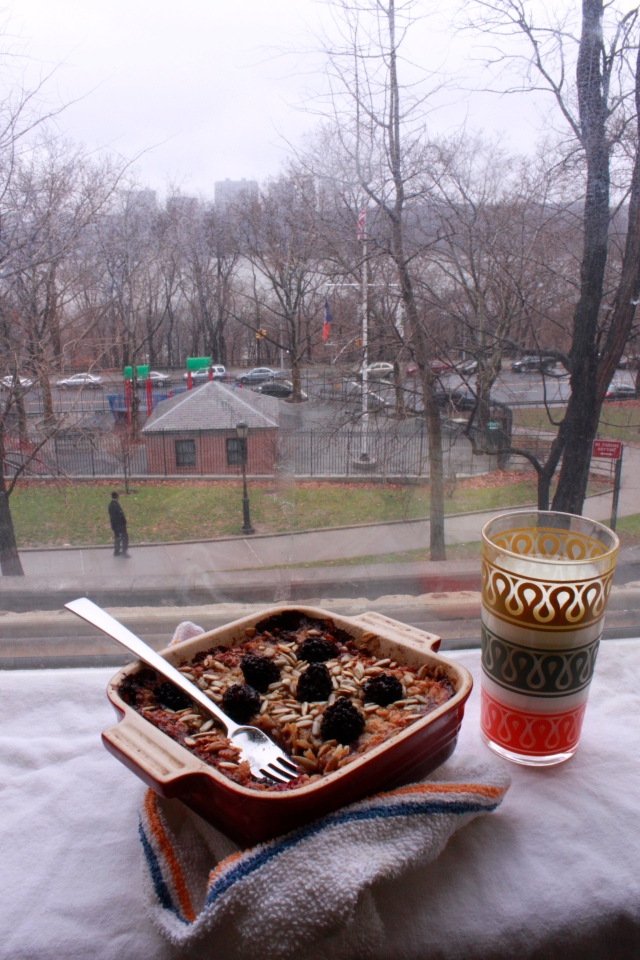
Blackberry Baked Oatmeal

Forgive that posting this recipe took more than a week – Alex and I were at a conference in the Windy City.  We had lots of fun!  I ate deep dish pizza 3 days in a row, learned that ranch dressing is an appropriate condiment to accompany garlic bread, had breakfast at M Henry where they serve what I call a “face latte” because it comes served in a “mug” the size of a soup bowl that hides my entire face when I drink from it, enjoyed catching up with colleagues, and, of course, reveled in the beautiful 40-degree weather.

I’m home again now, though, and am easing back into my January routine.  This week that routine consists primarily of alternating cycles of studying and panicking (I have a series of big exams coming up in, eep!, less than a week) – but I’m also trying to make time for things that calm me.  Which means I’m eating a lot.

Today I puttered around the apartment drinking coffee and doing some organizational work on my dissertation until I very suddenly discovered, sometime around noon, that I’d neglected to eat breakfast and was hungry. Oops!  I had no eggs, no cereal, and no toast – but I did have 4 containers of blackberries (yes, I feel guilty for eating out of season, but I also feel triumphant for getting them on sale) and a mason jar full of rolled oats. And, having recently stumbled across Heidi Swanson’s baked oatmeal recipe in Super Natural Every Day, I knew exactly what to make.  I adapted her recipe slightly and ended up with something delicious, filling, and healthy.

Blackberry Baked Oatmeal
serves 1 for a very hearty breakfast, or two if you want something lighter

Ingredients:
1/2 cup rolled oats
1/2 cup milk
6oz blackberries
Approx 2 tbl applesauce (you can also use 1 egg)
2 tbl maple syrup
large pinch cinnamon
small pinch kosher salt
1/4 tsp baking powder
couple handfuls sunflower seeds
1 tbl butter, melted
1/4 tsp vanilla extract

Directions

Preheat oven to 375*F.   Butter the inside of a small baking dish (mine was 4 x 4) and line it with blackberries enough to cover the bottom, making sure to reserve a handful.

In a small bowl, combine the oats, cinnamon, baking powder, salt, and a handful of sunflower seeds.  Cover the blackberries with the oat mixture.

In the same (now empty) bowl, whisk together the milk, applesauce, melted butter, a tablespoon of maple syrup, and vanilla, and pour that evenly over the oats.  Pick up the baking dish and drop it gently on the counter a few times (from a low height, like an inch or two) just to make sure that the milk makes its way through the oats instead of just resting on the top.  Sprinkle remaining blackberries and a handful of sunflower seeds on top, and then bake for 35 minutes or until thoroughly browned.

I found that the oatmeal was not quite as sweet as I liked, so I drizzled a tablespoon or so of maple syrup on top when it finished baking. That worked perfectly for me, but you should drizzle or not according to your tastes.  Ultimately, this was the perfect breakfast for a chilly, hazy day like today.  Enjoy!

Posted in Uncategorized | 1 Comment

The Pancake

This recipe is not mine (that honor goes to Melissa Clark) and it definitely has an official name.  But whenever Alex and I get a hankering for it – and let’s be clear about the fact that we have on two of the four mornings that thus far comprise 2012, and on many a lazy December 2011 morning as well – we just talk about having “the pancake”.

The pancake is super simple and super quick.  It has only a few ingredients, all of which I  always have on hand.  And it satisfies my constant craving for citrus.  Better still, for me at least, the process of making it today helped me begin work toward some of my resolutions for the year:

1. Get more comfortable with my camera. Actually learn how to use it so it’s not a $1300 paperweight. Today I learned how to set a custom white balance!  Baby steps…

2. Use my cookbooks more often.  I don’t know about y’all, but I find it all too easy to get sucked into the world of food blogs and end up cooking solely from recipes scribbled on scraps of paper or (worse yet, for my grease-covered iPhone) a computer screen.  In any case, I should spend more time with the tomes in my collection, doing something with them beyond just stroking the pages and going “oooohhhh” at the pretty pictures within.

3. Update the blog at least once a week!

So without further ado… I present to you the pancake.

The Pancake
*adapted from Melissa Clark’s recipe for The Mysterious David Dares Pancake, in In the Kitchen with a Good Appetite

Pancake Ingredients:
3 large eggs
1/2 cup milk
1/2 cup AP flour
big pinch of nutmeg (1tsp or so)
pinch of kosher salt
4 TBL unsalted butter
2 TBL confectioners’ sugar*
juice of half a lemon

Directions:

Preheat the oven to 425*F.

In a medium bowl, whisk together the eggs and the milk, and then add the flour and whisk that in, too.  Toss in a pinch of nutmeg (or, if you’re me, a teaspoon or so) and a pinch of salt and stir again.  There will be lumps.  Don’t panic.  It’s still going to be tasty.

Set the mixture aside and, in a large skillet (I use a 12″ stainless steel, but I hear that cast iron would work just fine), melt your butter over medium-high heat.  I usually just plop the butter in the pan and walk away until I can smell it getting toasty or hear it foaming – slightly browned butter is excellent here.  When the butter is melted to your specifications, pour the egg mixture into the skillet, put the skillet in your oven, and let cook for 15 minutes or so.

Now, given the instructions above, you will probably not be surprised when I tell you that I don’t set an oven timer for this. I cook the pancake when I want a relaxing breakfast, and I don’t find things beeping at me to be very relaxing. So my method of timing is to pour myself a cup of coffee, sit on my window seat with a cup of coffee, and read a few newspaper articles. Then I get up to check the pancake. When it’s brown and puffy I take it out. If it’s pale and flat, I leave it, and repeat the coffee/newspaper process until it is brown and puffy. But of course you could use a timer if you like. Really, it’s up to you.

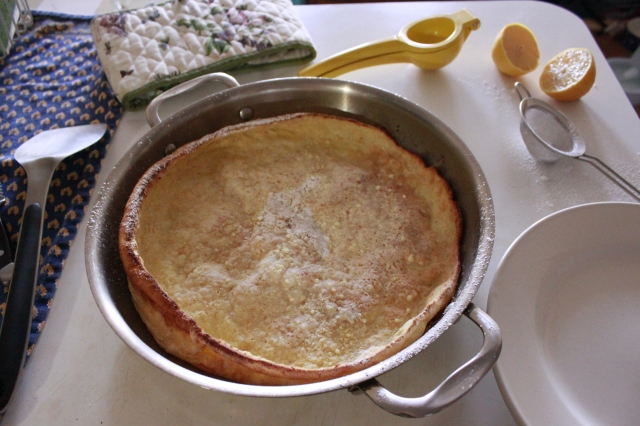
In any case, take the pancake out of the oven when it’s lightly browned and puffy.  There might still be pools of butter on the top of the pancake, and that’s perfect.  Using a small sieve, sprinkle the pancake’s surface with confectioners’ sugar (the buttery places will develop a sugary crust when all is said and done) and put it back in the oven until all the butter has absorbed into the pancake. This should only take a few minutes, so not enough time for more than one newspaper article.

When the butter has absorbed, take the pancake out and squeeze the juice of half a lemon over top.  It’s ready to eat!  Now, Melissa Clark says that this recipe serves 4, but Alex and I just always eat the whole thing between the two of us. We cut it down the middle, and then fold each of the semi-circles in half to create cute little wedges like you see above. Sprinkling again with confectioners’ sugar (just a little) is optional, but highly recommended.

*if you don’t happen to have confectioner’s sugar, just spoon a tablespoon or two of ordinary granulated sugar into a coffee grinder and blend until you do have confectioner’s sugar

Posted in Uncategorized | Tagged , | Leave a comment

Hello, again

I’ve been away for an unforgivably long amount of time.  For that reason I wouldn’t be surprised if no one reads this.  But I’m going to post anyway – and I hope I’ll be posting regularly from now on.  I just got so busy this summer, and then again this fall, and then I allowed life to run away from me in ways I really shouldn’t.  That’s one of my New Year’s Resolutions: slow down!  Don’t subsume myself entirely to my graduate career, or, worse yet, feel guilty when I have even one iota of fun.  That won’t be easy (disclaimer: I’m feeling guilty right now), but it’s certainly a worthwhile endeavor.  I’m willing for it to be a year-long work in progress.

In the meantime, here’s what I was up to over the past six (!) months.

First, I went to Pensacola for Thistle Nationals and spent the week racing sailboats with my Dad.  We went to a fleet dinner where I cooked this, which I really wanted to tell you about – but I had no computer access when I was at Nationals and then I went right into panic mode about comprehensive exams when I got home. I didn’t crawl out of that until September, so that explains a lot.

After the nightmare that was comps, I went to Chicago for a friend’s wedding. Alex and I were able to take a few days off work (thank you, New York, for the superbly timed October holidays) and spend some time together exploring the city.  The Sears Tower was especially cool.

After that, I got involved in a little movement you might have heard about – Occupy Wall Street.  I attended rallies all semester.  Here’s a shot of one of my favorite comrades, Lady Liberty.

Alex and I even helped write a book about Occupy Wall Street.  The New Yorker actually just published an article about it, which we were both quoted in.

Then there’s been the normal life stuff, too.  I worked a lot.

And had some kitchen adventures.

Now I’m winding down, getting ready for what I hope will be a big and exciting new year.  If everything works out the way I’m planning it, you’ll be seeing a lot more of me around the blog. I’m looking forward to it!  And in the meantime, happy holidays!

Posted in Uncategorized | Leave a comment

CSA Challenge, Round 2

This week:
CSA:
beets
beet greens (clearly, Alex and I are not the only ones in our household who enjoy these)
2 new onions
2 HUGE zucchini (two pounds apiece, y’all!)
2 cucumbers
1 bunch curly kale
red leaf lettuce
fennel
fennel fronds
salad mix
1qt peaches

Then I cheated a little. I got SICK of waiting for tomatoes, so this morning I walked up to my neighborhood greenmarket and bought a few goodies to supplement my CSA share. I knew what I’d be getting from the CSA, so I was careful not to get duplicates.

Greenmarket food I purchased:
3 heirloom tomatoes
3 green tomatoes
1 lb. green beans
2 HUGE bunches basil, yielding 4 cups each – not pictured, because I already used them!

Leftover veggies from last week: 1 bunch curly kale, fennel fronds, dill, heart of the romaine (we’ve finished the vast majority of it), 1/4 head of green cabbage

Bought to supplement (so far): baguette, lemons, ginger, chicken thighs, chickpeas, 1/4lb garlic/ginger cheddar (from the greenmarket). I anticipate getting tofu and eggs later in the week.

Now for the fun part!

What I ate last week:
Summer Squash and Potato torte
Buttermilk Squash Soup
Chicken thighs roasted with onions/cabbage
Apple and shaved fennel salad
Lots of romaine-based salads
Lemony Chickpea Stir-fry with kohlrabi, kale, vidalia onion, tofu
Lemony Chickpea Stir-fry with beet greens, spring onion, tofu
Romaine salad with roasted beets, goat cheese, and a honey vinaigrette
Kale pizza
The peaches I diced up and froze, to make cobbler with later

The recipes I linked to are all recipes I either made up on the fly (kale pizza!) or have added to my recipe collection so I can make them again. I’m sure I’ll post details on my tweaks at some point, but for now I’ll just hint at two: the Lemony Chickpea stir-fry is so freakin’ adaptable that you can put ANYTHING in that pan with the chickpeas, something green, and some lemon and make it work. Also, the chicken with cabbage and onions I did this week was a bastardized version of a chicken and fennel recipe.  Turns out that you can use onions and cabbage in place of the fennel. I usually toss in some ground anise seed or fennel seed (I do the grinding with my mortar and pestle) for that sweet, licorice-like flavor, but the substitution works.

Posted in Uncategorized | Tagged | Leave a comment

Kale Pizza

This week’s CSA challenge was less challenging than expected, despite a couple of potential roadblocks including my being away from home for an entire day, me having to adjust my cooking style for a houseguest who loathes tofu and lentils, and us eating out a lot with said houseguest.  Nonetheless, I cooked the squash up in the first few days – and discovered a few new recipes I can use to get through it all – and have spent the last few days eating leftovers and using up a few remaining ingredients.

Surprisingly, kale is one of them! I got two bunches at the CSA and expected they’d go quickly: it is one of my favorite things to eat, after all. And though I diligently added kale to nearly everything I ate, when I sat down to think about today’s lunch I found a bunch and a half languishing in the fridge. Thought one: jeez, I’ve been eating kale all week. We must be getting awfully big bunches.  Thought two: Yay! Now I can make kale pizza again!

I invented this recipe a few weeks ago when I only had kale, sundried tomatoes, and mozzarella in the fridge. I wanted to make pizza, but was skeptical about making it without a tomato sauce. And all the white pizza recipes I saw seemed to require more than one cheese, which I didn’t have. I forged ahead anyway, my hunger pushing me along, and ended up with the following recipe. It’s becoming a go-to meal for me and Alex, and he smiled with glee when I told him what we’d be eating for lunch today. Hopefully you’ll try it and it’ll make you smile, too.

Kale Pizza
*pizza’s my own, but crust is credit to smittenkitchen

Pizza Crust Ingredients:
1.5 cups all purpose flour
1.5 cups whole wheat flour
2 tsp salt
1.5 tsp active dry yeast (I find that one packet is enough)
1 cup lukewarm water
2 TBL olive oil

Toppings:
roughly 1/4 cup diced sundried tomatoes (I make them pretty small squares)
2 cups packed kale (I strongly favor the curly kind), rinsed and spun dry
8oz ball mozzarella, the fresher the better
a couple TBL olive oil
2 cloves garlic

Directions:

First, make the crust – it requires about an hour of rest time, so you need to plan ahead! Combine the dry ingredients, stirring, and then add the water and olive oil. With a spatula, stir gently until combined. Then turn out onto a lightly floured counter and knead for a couple minutes, until the ingredients come together and you can make a ball.

Spray the inside of the mixing bowl with olive oil, and put the ball of dough back in. Cover the plastic wrap and set in a warm place, for about an hour or until it doubles in bulk.  Turn out onto the floured counter and gently press the air out of the dough, form it back up into a ball, place back into the bowl, cover with the wrap, and let site for 20 min. This is the point at which I preheat the oven (roughly 425*F) and begin prepping all the topping ingredients. It might take a few more or a few less than 20min to do so, but I’m not concerned with being that precise.

First, put a couple TBL olive oil in a small bowl with the minced garlic, then set aside. Chop the kale into bite-sized pieces, and then make sure the sundried tomatoes are chopped.  Thinly slice the ball of mozzarella so you have as many circles of cheese as you can manage. Finally, sprinkle your pizza stone with cornmeal.

Now you’re ready to roll out the crust and dress the pizza. I find that I have very little trouble rolling out this dough, but I’m also always careful to flour the counter and to pick up the dough and flip it over from time to time. I’m pretty sure that this prevents it from sticking. Roll out the dough to just over 12″. Again, I’m not precise – but it is important to me that the dough fit on my pizza stone, so my personal rule of thumb is to never roll it bigger than that. Once the pizza is rolled out, transfer it to your pizza stone.

Get a pastry brush and use it to brush the surface of the dough with the olive oil/garlic mixture, leaving about an inch around the edges. Lay the kale inside the olive oil circle. It’s ok if it seems a little thick and piled up – it’ll wilt down. Sprinkle with a small handful of the sundried tomatoes, top with the cheese, and then put the rest of the sundried tomatoes on top.  That’s it – now it’s oven time. I cook mine until the cheese is browned, just on the verge of being burnt. Maybe about 10min? I’m not sure – so check it every 5, I suppose. That’s what I do.

In any case, you’ll find that the kale wilts down and becomes tender, except where the cheese didn’t cover it – in which case it becomes crispy and crunchy. The sundried tomatoes provide a pop of sweetness, and the crust is just the right kind of hearty and bready to match well with strongly flavored greens. Enjoy!

Posted in Uncategorized | Tagged | 2 Comments

CSA Challenge, Round 1

I’ve been thinking a lot about food. I mean, I usually think a lot about food on a regular basis, just for meal planning purposes, but lately I’ve started to think more and more about why I eat what I do. As I’m growing closer to 30, I’m trying to be healthier, which means eating a more balanced diet, and I’m also concerned with the nation’s food industry. We can debate the merits of industrial food production another time, but for now it’s enough to say that I disagree with the system, I think it’s crappy for people and for the planet, and that as long as I can get my food elsewhere I will.

I’ve been a member of a CSA for almost two years now, and I’m taking my commitment to healthy, local foods seriously – I don’t get eggs or meat from my CSA, only veggies and fruit, but I also don’t allow myself to buy eggs, meat, or most dairy unless it’s local. Similarly so with non-CSA veggies. But it turns out that these rules alone are not enough to absolve me of food-related crimes against my conscience: one of my big problems with using my CSA veggies last year was that a lot of them went to waste. I’m sure some of that was a side effect of having one four-person CSA share for my two-person household, but I also planned meals poorly and got stuck in recipe ruts instead of pushing myself to try new things that would fully use my weekly bounty.

This year will be different. I’m already doing better than last year, but I figure this blog is as good a place as any to keep track of my attempt to not only eat local, but to also eat everything in my CSA box each week. From now on, I’ll post information about my haul when I get it on Tuesdays (or Wednesdays, once my semester starts and I’m super busy) and then keep you updated with what I got, what I made with it, and what, if anything, I bought to supplement it. So – let’s get started!

This week:

2 bunches curly kale (my favorite!)
one head romaine lettuce
1 bunch small beets, which means I can use the beet greens as well
1 fennel bulb
1 bunch fennel fronds
3 new onions
2 large cucumbers
2 medium-sized yellow squash – my biggest challenge, because I loathe summer squash
1 qt. peaches

Leftover veggies from last week: 2 purple kohlrabi, 1 zucchini, half a bunch of scallions, 1 garlic scape.

Bought to supplement (so far): parmesan cheese, goat cheese, potato, 5 pickling cucumbers, bunch of dill, half a head of green cabbage (which actually is several weeks old), tofu.

My mission to use as much of this as possible is complicated this week since my father-in-law is in town – I’ve only cooked once since he got here! – but I’ll post the recipe I did cook, and a run-down of everything I was able to make with my veggies, later this week.


Posted in Uncategorized | 1 Comment

Radish Greens Pesto

This is not a precise recipe: this was a recipe driven by desperation, by my realization that I was on my own for dinner with nary an ingredient in sight. Truth be told, I’ve had quite a few of those this week: our bank account is a bit low, and we’ve decided to eliminate food waste anyway, by pushing ourselves to use what we have on hand rather than buy groceries when at all possible. This, so far, has resulted in a few pretty decent meals: a lemon-ricotta pasta with basil that we devoured for dinner a few days ago and which I will tell you about later, my learning that pasta can sometimes work as a reasonable stand-in for bread, a chickpea salad with poached egg (lunch for two: can of chickpeas, drained; a bit of leftover avocado mashed with juice of half a lemon; a quarter of vidalia onion, diced; a cup or so of chopped fresh basil; stir, spoon into 2 bowls, put a poached egg on top of each, nom).

Though these were all good, I think I might be happiest with this pesto recipe. It tastes good, but it’s also the meal that took the most thought and creativity. See, I had a few bunches of radish leaves left over that I knew I needed to do something with… and then not a lot else. I mean, I had a couple eggs, some tofu, a couple servings of leftover rotini, a chunk of parmesan, some nuts languishing in the pantry, grapes, about half a cup of freshly squeezed lemon juice… you get the picture. I felt I had NOTHING, yet really needed to eat something. Then inspiration struck! Pesto.

I hope it also serves as inspiration to all of you to KEEP YOUR RADISH GREENS! Don’t throw them out. In fact, don’t throw out any of your veggie greens. Beet, carrot, turnip, radish – all edible! And all super nutritious, and super delicious. Enjoy! (ps – sorry for no picture. i was way too hungry to stop eating and snap a few shots)

Radish Greens Pesto

2 bunches radish greens, washed well
2 garlic scapes, minced
1/2 cup – 1 cup parmesan cheese, grated
1/4 cup – 1/2 cup hazelnuts
4-5 TBL lemon juice
a couple TBL olive oil
salt, to taste (I probably tossed in about 1 tsp)

Toss the greens in the food processor and blend. I found that I had to do puree one bunch before the second would fit in the bowl. I also had to toss in a bit of olive oil to lubricate the whole process. Then I minced the garlic scapes and threw them in, and kept the machine running as I added the hazelnuts.  I stopped the machine and took the top off to throw in the parmesan cheese, then put the top back on and blended some more, adding in a couple TBL of lemon juice as it was running.

This is the point at which stopping to taste and check texture becomes important. You may need more or less lemon juice, salt, and olive oil than listed here – especially because I’m not even sure that these were the quantities I used. I do know that when I got the blend right, it tasted wonderful: a bit more peppery than basil-based pesto, with a wonderful lemon flavor and a great almost earthy quality from the hazelnuts. Of course, you should season to your tastes, which might be different from mine!

Makes a couple cups (not including the couple spoonfuls I took out to put over my leftover pasta!)

Posted in Uncategorized | Leave a comment